If you have been wondering how to start a backyard compost pile, the honest answer is that it takes about an hour, no tumbler and no special equipment. Pick a shady, well-drained spot, layer carbon-rich browns with nitrogen-rich greens, dampen each layer until it feels like a wrung-out sponge, and turn it every few weeks until the stuff turns dark and crumbly. That is genuinely all the method is: air, moisture, carbon and nitrogen in roughly the right proportions.
Beginners worry about the wrong things. You do not need worms, a special activator, or a perfect bin. You need somewhere to put it and about five buckets of material to start, and a bit of attention for the first three months.
Table of Contents
- What You Need to Start a Backyard Compost Pile
- Step-by-Step
- Step 1: Choose the Right Location for Your Backyard Compost Pile
- Step 2: Gather Brown and Green Materials
- Step 3: Build the Base and First Layers
- Step 4: Add Moisture and Cover the Pile
- Step 5: Turn the Pile for Better Decomposition
- Step 6: Maintain the Pile and Use the Compost
- Common Mistakes
- Frequently Asked Questions
- Do I need a compost bin, or can I just make a pile?
- What should not go in a compost pile?
- Why is my compost pile not heating up?
- How often should I turn compost?
- How long does backyard compost take, and how do I know it is ready?
- Get Your First Pile Built Today
What You Need to Start a Backyard Compost Pile
Everything comes down to two lists. Browns are the dry, carbon-rich side: fallen leaves, shredded cardboard, plain newspaper, straw, hay, small twigs, sawdust from untreated wood, and spent potting compost. Greens are the fresh, nitrogen-rich side: grass clippings, coffee grounds, vegetable and fruit scraps, eggshells, tea bags, and fresh garden trimmings.
The working ratio is two to three buckets of browns for every one bucket of greens, measured by volume as you hold them. Regulars on r/composting repeat that figure more than any other, and the useful part is that being slightly off does not ruin anything. It only slows the pile down.
Aim for a pile at least 3 feet by 3 feet and no more than 5 feet by 5 feet in a single heap. Anything smaller than 3 feet square loses heat too quickly to get going properly.
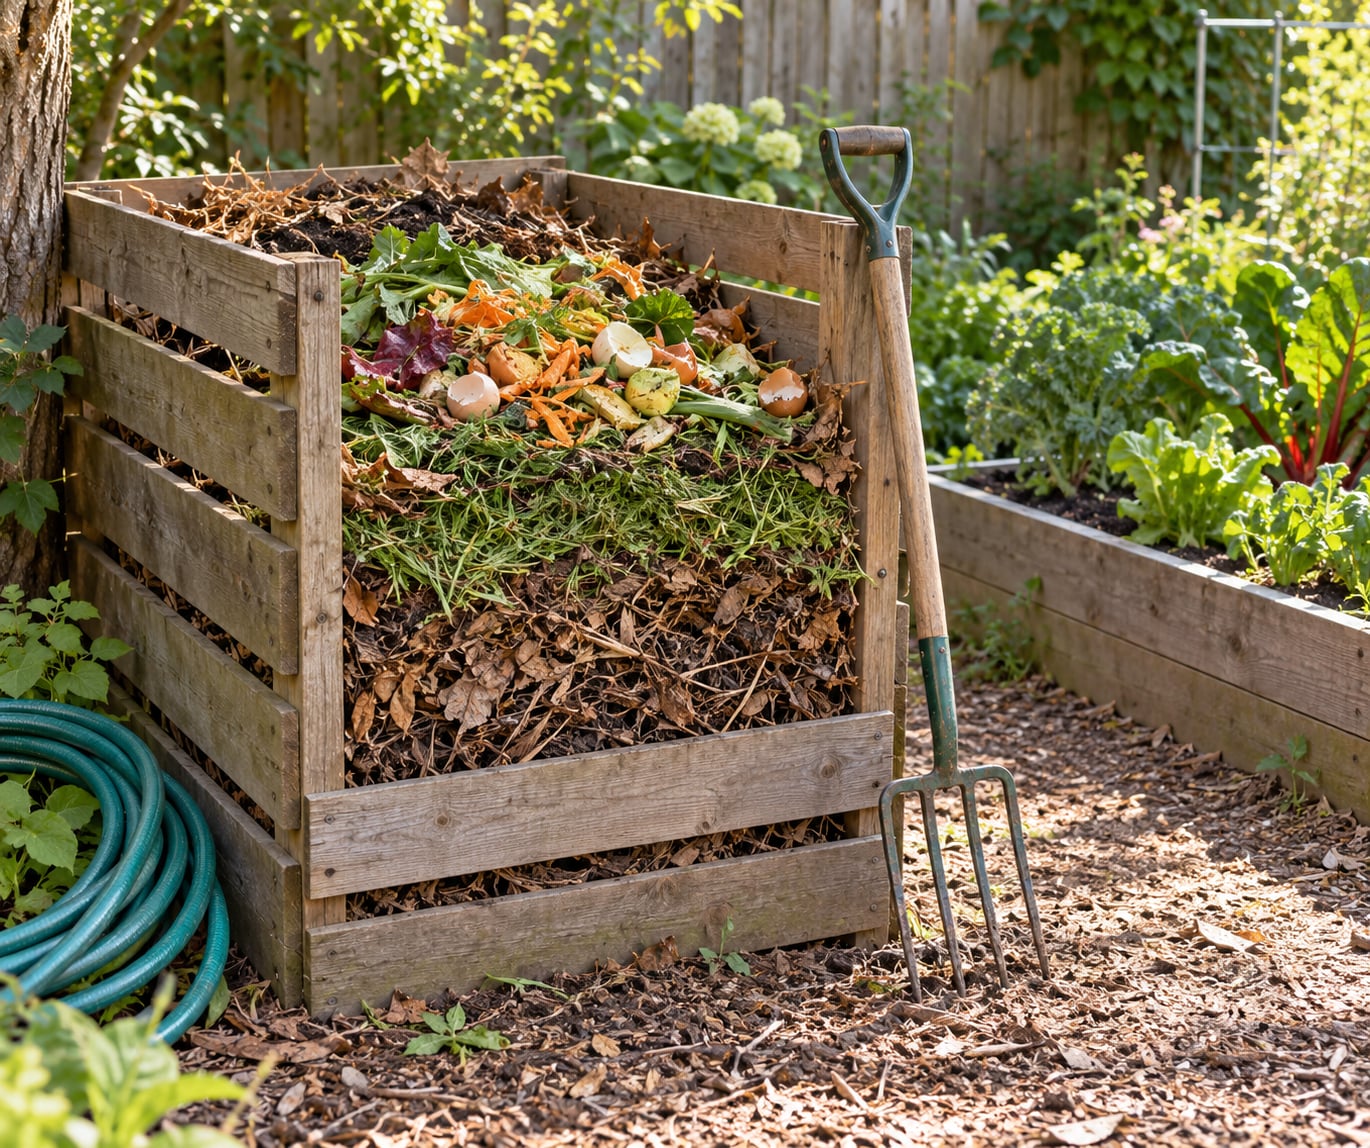
Tools are short. You want a pitchfork or garden fork for turning, a hose or watering can within reach, and a wheelbarrow if the pile is more than 20 feet from the house. A long probe compost thermometer is useful but not required, and a loose tarp or old sheet is handy for rainy weeks. Shredding branches to fist size with a pair of loppers or a mower makes decomposition noticeably faster than leaving them whole.
Step-by-Step
Step 1: Choose the Right Location for Your Backyard Compost Pile
Look for partial shade, level ground, and drainage. Full sun dries a pile out in a day or two, and a low spot turns anaerobic and foul, so pick a site on a slight rise if you have one. Keep the pile within easy reach of a spigot or hose.
Set it back from doors, windows, downspouts and waterways so runoff never carries nutrients away, and keep it at least a couple of feet from foundations. Tree roots find compost piles fast, and a pile built against a trunk will pull the roots toward it.
Wind direction is worth a thought too. Most of the trouble that sends people searching for advice on a smelly pile starts with a pile too close to a neighbour’s fence on a warm day.
Step 2: Gather Brown and Green Materials
Shred or chop as much as you can. Small, ragged pieces have more surface area for microbes to attack, which is why a bag of unchopper autumn leaves can sit in a heap for a year while the same leaves in a shredder vanish into the pile in a few months.
| Material | Type | How it behaves |
|---|---|---|
| Dry leaves | Brown | Maintains airflow; shred them for speed |
| Shredded cardboard and plain paper | Brown | Absorbs excess moisture; remove plastic tape and coatings |
| Straw, hay, untreated sawdust | Brown | Slows wet greens; best for balancing a pile heavy with scraps |
| Grass clippings | Green | Wets the pile quickly, so mix rather than layer thickly |
| Vegetable and fruit scraps, coffee grounds | Green | Feed the heat; bury a few inches down to discourage pests |
| Eggshells, tea bags (unbleached paper) | Green | Break down slowly, useful in small amounts |
Leave out meat, fish, dairy, cooking oils, pet waste, diseased plants and perennials full of seed, black walnut leaves or hulls, charcoal ash, treated or painted wood, and anything with a plastic, glass or metal label attached. Manure from carnivores is on the list for a reason, and the same goes for human waste from anything other than a properly designed system.
Step 3: Build the Base and First Layers
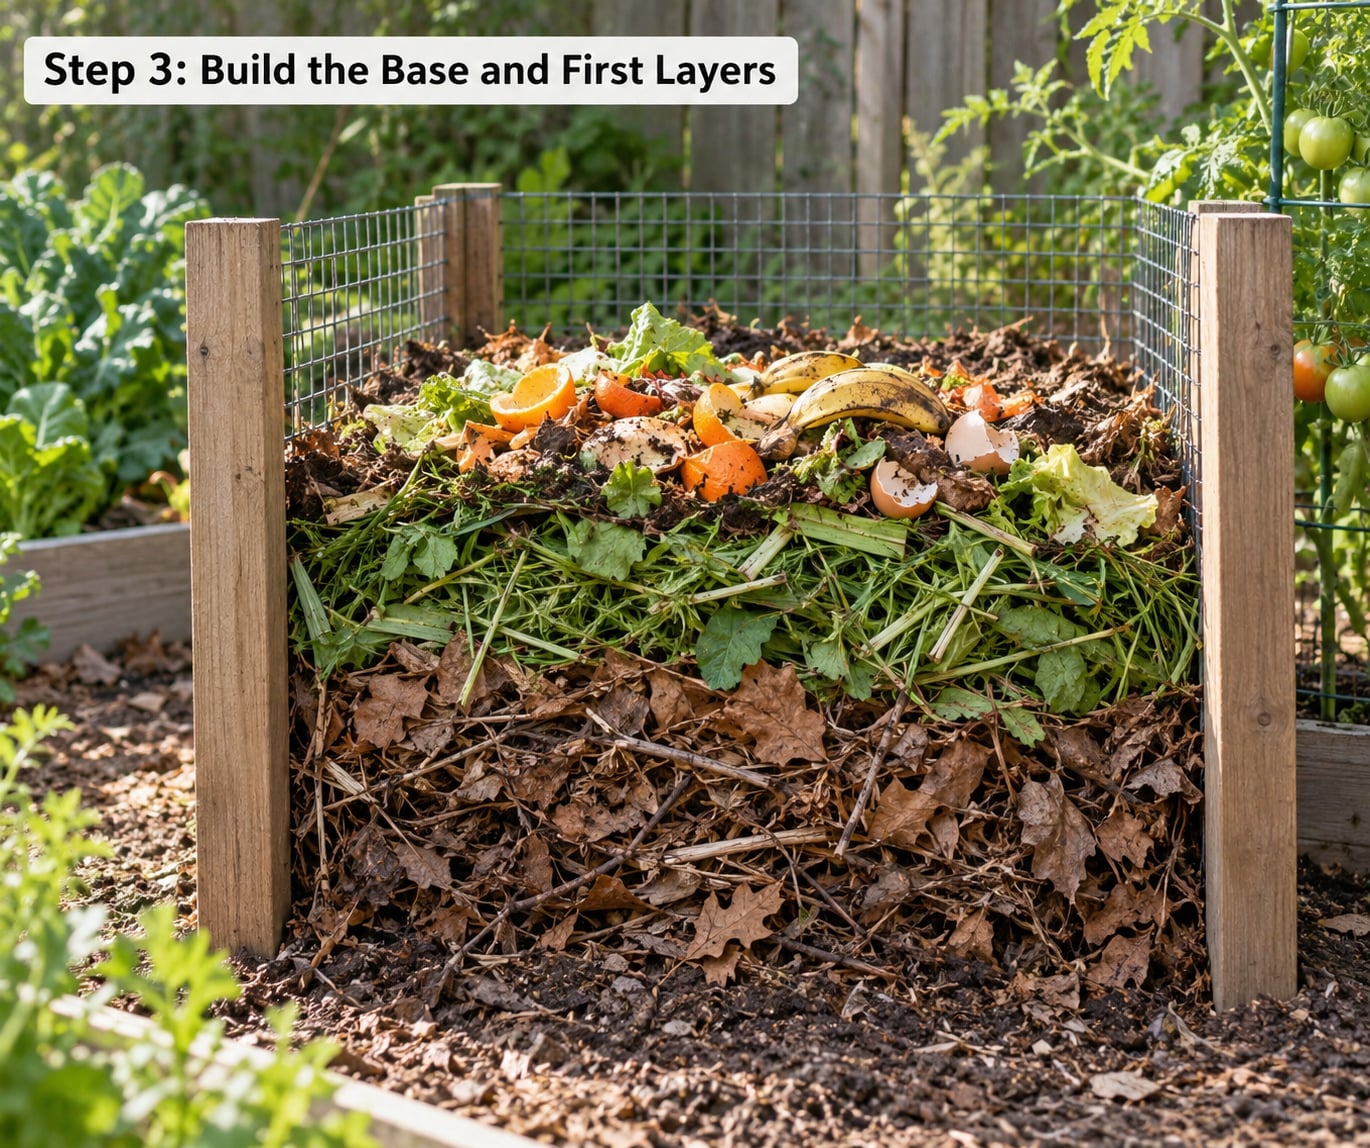
Start with a loose base of coarse material: small branches, twigs, or the woody ends of your chopped materials, roughly 6 inches deep. Air moves up from the bottom of a pile, and without that base the material at the bottom slumps into an airtight lump and stops breaking down.
Then work in layers about 4 to 6 inches deep. Add browns first, greens on top, browns again, and keep going until the pile stands roughly waist high. Always finish with a browns cap, because greens left exposed on the surface are what fruit flies and wasps find first.
Break up thick green layers with a fork as you go. Grass and fruit scraps packed together hold a lot of water with no air between them, and that is where the anaerobic smell starts.
Step 4: Add Moisture and Cover the Pile
Moisture matters more than anything else you control. After each layer, dampen it until it feels like a wrung-out sponge: squeeze a handful and it should just barely hold together without dripping. If you can squeeze water out of it, it is too wet; if it crumbles dry in your hand, it is too dry.
A dry pile decomposes slowly no matter how good the ratio is, and a saturated pile goes anaerobic and starts smelling like a bin. If the material was wet to begin with, such as grass straight from the lawn, skip the watering and add extra browns instead.
On top, lay a loose layer of straw, leaves or a light tarp to slow evaporation. Leave gaps so air can still get in, and cover only when the pile is hot or when heavy rain is coming. A tight plastic sheet in warm weather traps heat nicely but seals out oxygen, which is the opposite of what you want.
Step 5: Turn the Pile for Better Decomposition
Turn it once every two to four weeks during warm months. A working pile is hot in the middle and cooler at the edges, and when you turn it you move that hot centre outward and pull the cold outside material into the core.
Use a pitchfork or garden fork rather than a shovel, and lift from the bottom. Break up any dense mats as you go, and rebuild the pile as a loose cone or pyramid. If you are working with a small amount of material, the pyramid shape is the trick: the extra height keeps the mass big enough to hold heat even though the footprint is small.
Check moisture while you are in there. Add water to dry sections, add browns to anything wet, and expect the pile to shrink noticeably after each turning. That volume loss is normal; the material is collapsing into humus.
Step 6: Maintain the Pile and Use the Compost
Here is roughly what the first six months look like. In week one, keep adding material as it comes, burying fresh greens a few inches down, and water when it looks dry. Around week four you should feel warmth in the middle if the pile is working, and it will have shrunk by a third or more.
By month three, after two or three turnings, the material should be dark, crumbly and unrecognisable, though some coarse pieces often survive to the end. Between month three and month six it finishes curing, and any remaining structure breaks down without much heat.
Finished compost is dark brown to nearly black, crumbly, smells like forest floor rather than kitchen, and feels cool to the touch in the middle. If you can still name what is in it, it is not finished. Give it another month or two rather than digging it in half-ripe.
Use it as a soil conditioner: blend a few handfuls into the top few inches of raised beds, blend it into potting mix for container plants, or top-dress beds in early spring before new growth starts. Keep raw compost out of containers used for edible crops, where roots sit right in the mix.
One trick I like: hold back two or three buckets of leaves in a wire cage beside the pile through autumn. Leaf mould on its own takes about a year and makes an excellent mulch or seed-starting medium.
Common Mistakes
Almost every problem a beginner hits comes down to one of five things. Here is how to spot each one and what to do about it.
- The pile is too dry. Material is pale, crumbly and dusty, and it never warms up. Fix it by watering thoroughly at every turn until a squeezed handful holds together.
- The pile is too wet. It smells sour or rotten, and liquid seeps out of the bottom when you press down. Fix it by mixing in two or three buckets of shredded cardboard, dry leaves or straw and turning to open air pockets.
- The pile is too small. Anything under 3 feet by 3 feet stalls. Fix it by combining it with a neighbour’s pile or building a taller pyramid instead of spreading it thin.
- The pile is too compact. It has slumped into a dense slab. Fix it by breaking it apart with a fork and rebuilding it loosely, or by adding coarse sticks and twigs to restore airflow.
- Too many greens, not enough browns. The pile is slimy, flies appear, and the ratio has tipped toward nitrogen. Fix it by covering every new addition with 4 to 6 inches of browns, and treat a smelly pile the same way.
Two smaller mistakes are worth naming. Burying meat, dairy or pet waste attracts rats, raccoons and flies no lid can keep out, and adding a bag of soil or a shovelful of manure as a starter is unnecessary. A pile built from the right materials in the right order heats on its own.
If you can only do one thing to protect the whole setup, put a browns cap over anything green each time you add to the pile. It costs nothing and it solves the majority of complaints.
Frequently Asked Questions
Do I need a compost bin, or can I just make a pile?
You can skip the bin entirely. An open pile works well if you build it at least 3 feet by 3 feet, layer materials the same way and keep turning it. A bin or wire enclosure mainly stops scraps from scattering, keeps the pile neater and stops dogs digging. If you build nothing at all, put the pile on bare soil so worms and insects can move in and out freely.
What should not go in a compost pile?
Keep out meat, fish, dairy and cooking oils, pet waste and human waste from household systems, diseased plants and weeds full of seed, black walnut leaves and hulls, charcoal ash, treated or painted wood, and anything plastic, glass or metal. These attract pests, smell, or slow the pile down. Shredded plain cardboard and newspaper are fine, provided you remove plastic tape and coatings.
Why is my compost pile not heating up?
Five causes cover almost every cold pile: it is under 3 feet square, it is too dry, it is too wet, the brown-to-green ratio is off, or the material was packed down without air. Feel the middle after a day or two to check. It should be warm to hot near the centre and only slightly cooler at the edges. If it feels cool everywhere, fix the moisture first, since that explains most cases.
How often should I turn compost?
Turn it every two to four weeks in warm months, and not at all in deep winter. The first turn belongs around two to three weeks after you build the pile. Each turn moves hot material from the core out to the edges, mixes in air and lets you check moisture and add water or browns. Turning too often, several times a week, cools the pile and slows things down.
How long does backyard compost take, and how do I know it is ready?
A well-built hot pile can be finished in two to three months, while a small pile or one with whole, unshredded materials can take six months to two years. It is ready when the material is dark, crumbly, cool in the middle, smells like forest floor, and you cannot identify any of the original scraps. Rushing it does not help; unfinished compost belongs in the bottom of a bed, not around roots.
Get Your First Pile Built Today
Start this afternoon. Walk the yard, pick a shady well-drained spot, and gather five buckets: three of browns, two of greens. Build it in layers, dampen each one, cap it with browns, and come back in three weeks with a fork. The rest is attention, not equipment.